IPC Solutions CM 1.5.1.0 portal guide (admin) v1a
Contents
Communications Manager Version 1.5.1 admin portal guide
Introduction to the Admin Portal
Admin Portal - your central hub for managing and configuring your Communication Manager with ease and efficiency. Designed to empower administrators with comprehensive control, the Admin Portal offers a range of powerful tools and features tailored to meet your organisational needs.
Within the Admin Portal, you'll find a suite of essential functions to streamline system management and optimize performance. From user configuration and group management to call forwarding settings and call recordings, every aspect of your Communications Manager is at your fingertips.
Logging into the admin portal
To access the Admin Portal, simply navigate to the following URL: https://XXXXX.ipcportal.tel/
Please note that you will need to replace "XXXXX" with your Communications Manager Access Code – contact your telephony provider if unknown.
Upon accessing the portal, you will be prompted to enter your username and password which will have been sent to you by email. These credentials will log you into your user portal.
If you forget your password, you can contact your telephony provider support team for assistance with password reset.
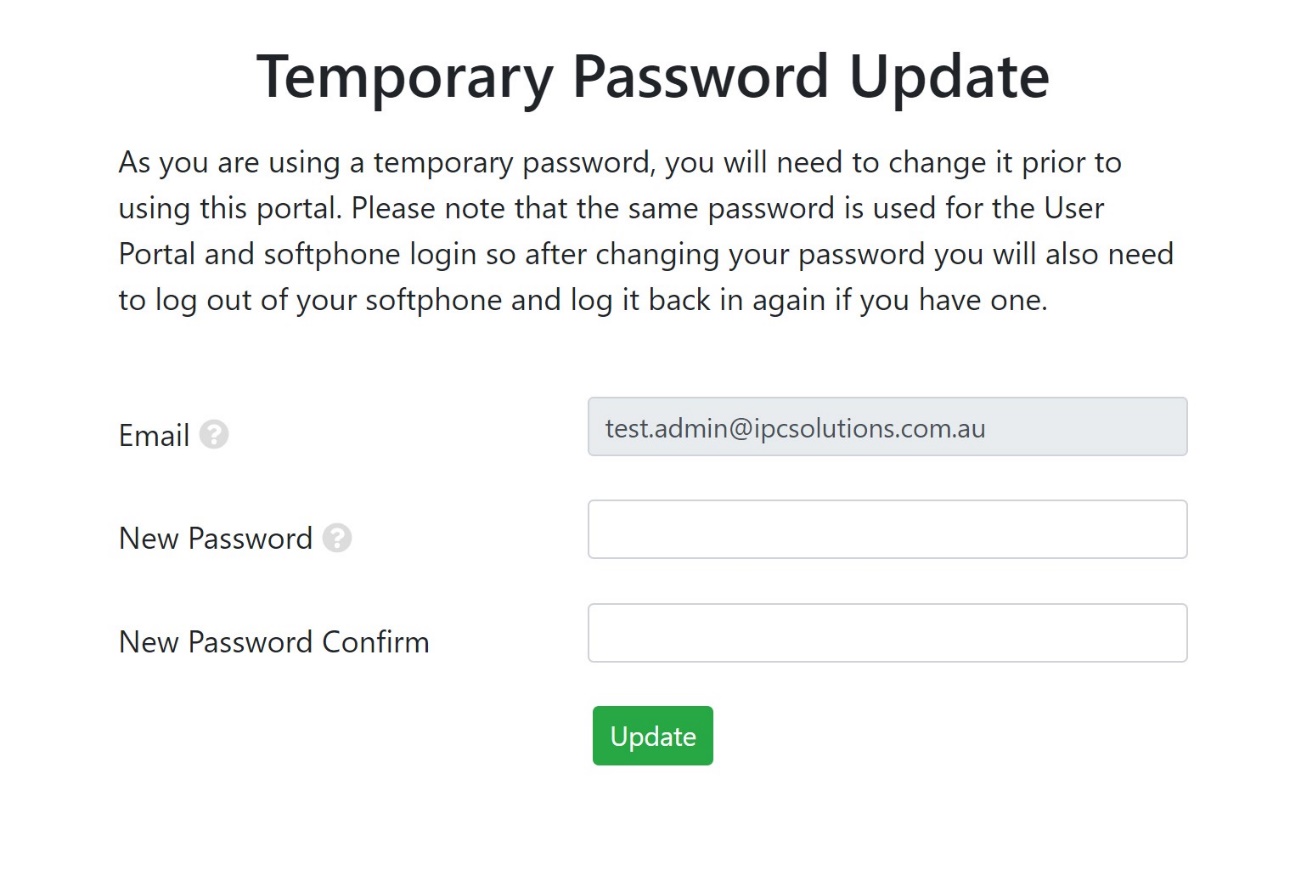
Upon your first time logging into the portal, it may ask you to change your password from the temporary one we provided to your own password. Please note that this login will be the same for your user portal and softphone, so if you change the password for one of these systems, you will need to log back into the other systems with your new password.
The parameters to create a new password are as follows:
Password must be more than 8 characters and contain at least 1 number, 1 uppercase and 1 lowercase letter. It may also contain 0 or more of the following characters: !@#$%
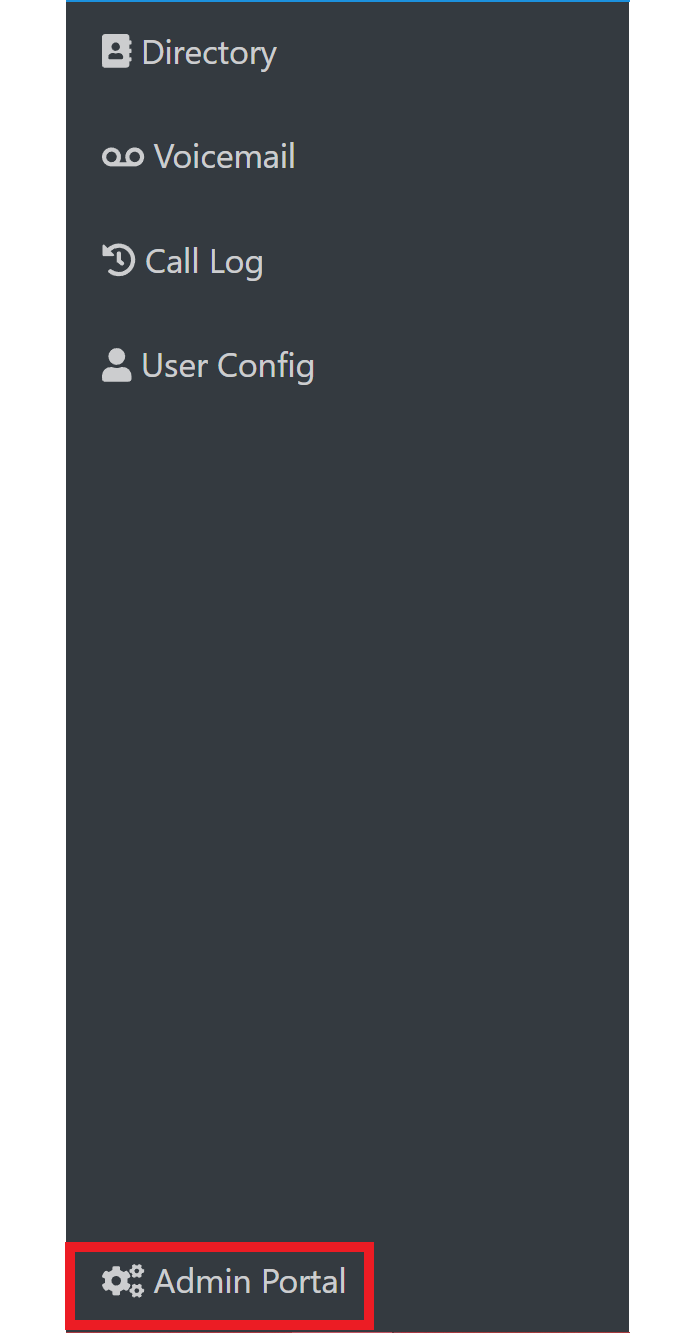
Once you have successfully logged in, you will then need to access the admin portal by selecting “admin portal” at the bottom of the menu on the left.
The Admin portal Interface
Features of Admin Portal
User Configuration
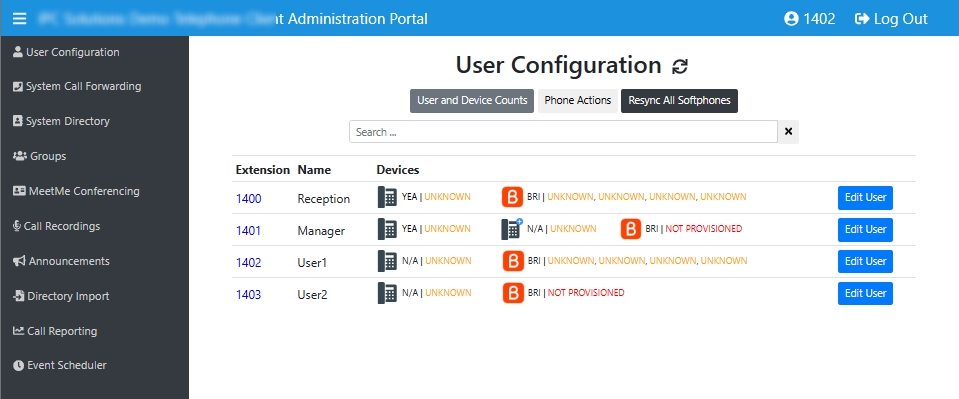
The User Configuration page provides a comprehensive overview of all users within the system who possess either a physical phone, a softphone, or both.
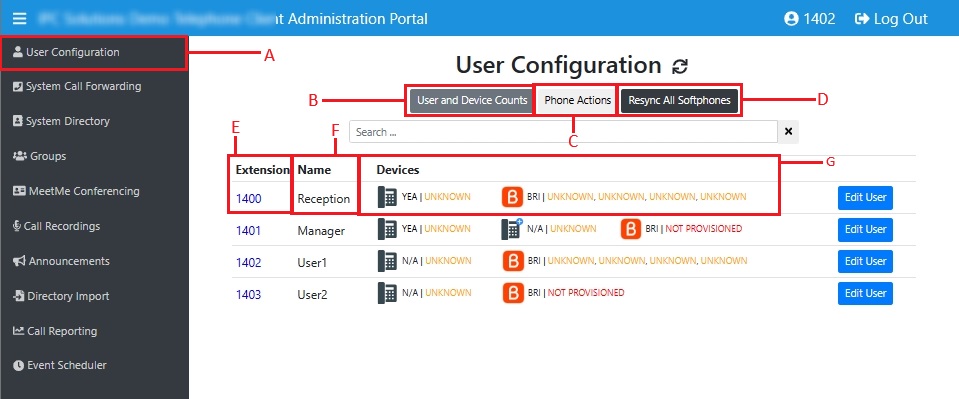
Interface layout:
A: User configuration tab
This section shows that you are currently in the User Configuration tab. Selecting other options on this side bar provides access to other functions.
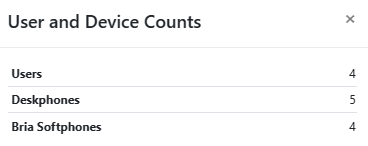
B: User and Device Counts button
By clicking this button you will be able to see the number of Active Users, Number of Desk phones provisioned and Number of Bria Softphone Licenses Provisioned. Note this is not the actual count of users that are currently registered or online, but rather shows the number of licenses you have.
Example:
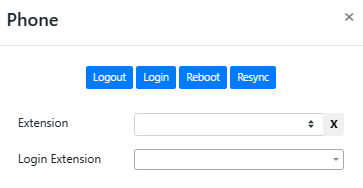
C: Phone Actions button
This button allows you to perform some actions on one or more handsets that are currently online.
Example: You can select an Extension number and Logout the extension, Login the extension, Reboot the desk phone and Resync the desk phone without physically accessing the device. Note that resyncing a desk phone is required to update phone interface elements after relevant changes have been made to one or more extensions. For example, if a particular extension Name has been changed, both that desk phone and any phone that shows that extension on a line key will need to be resynced to reflect the change. Resyncing phones is safe to do in all circumstances. Rebooting a desk phone should only be done when certain a call in not in progress on the phone.
D: Resync All Softphones button
This button will synchronise phones to update any interface elements that have changed. This will not reboot the phone.
E: Extension Column:
This column displays the unique extension number assigned to each user. Note that an extension can have one or more devices attached.
F: Name Column
Shows the name associated with each extension.
G: Devices Column
This section lists the desk phones and softphones associated with each extension, and the connectivity status of each device. When a call is made to a specific extension/user, how associated devices ring is defined in the User configuration (click the relevant Edit User button).
Checking the connectivity status of users
Each device entry under Column Device is accompanied by a status indicator.
A green label labelled "OK" signifies that the user's device or softphone is presently registered and online.
Conversely, if the label appears as "UNKNOWN" in yellow, it indicates that the user has a provisioned device or softphone, but none are currently online.
A red label of “NOT PROVISIONED” indicates that there is still work to be done by the telephony provider to enable softphone functionality.

Understanding the above Screenshot:
Extension 1400
Name of the user is Reception
A Yealink phone and a Bria softphone are provisioned but both are offline
Extension 1401
Name of the user is Manager
Two Yealink deskphones are provisioned, but both are offline. A Bria softphone is enabled but not provisioned
Extension 1402
Name of the user is User1
A Bria softphone is provisioned but is offline
Extension 1403
Name of the user is User2
A Yealink phone is provisioned and offline, A Bria softphone is enabled but not provisioned.
Updating user details and syncing
The user details of an extension can be updated by clicking the associated Edit User button. As explained below:
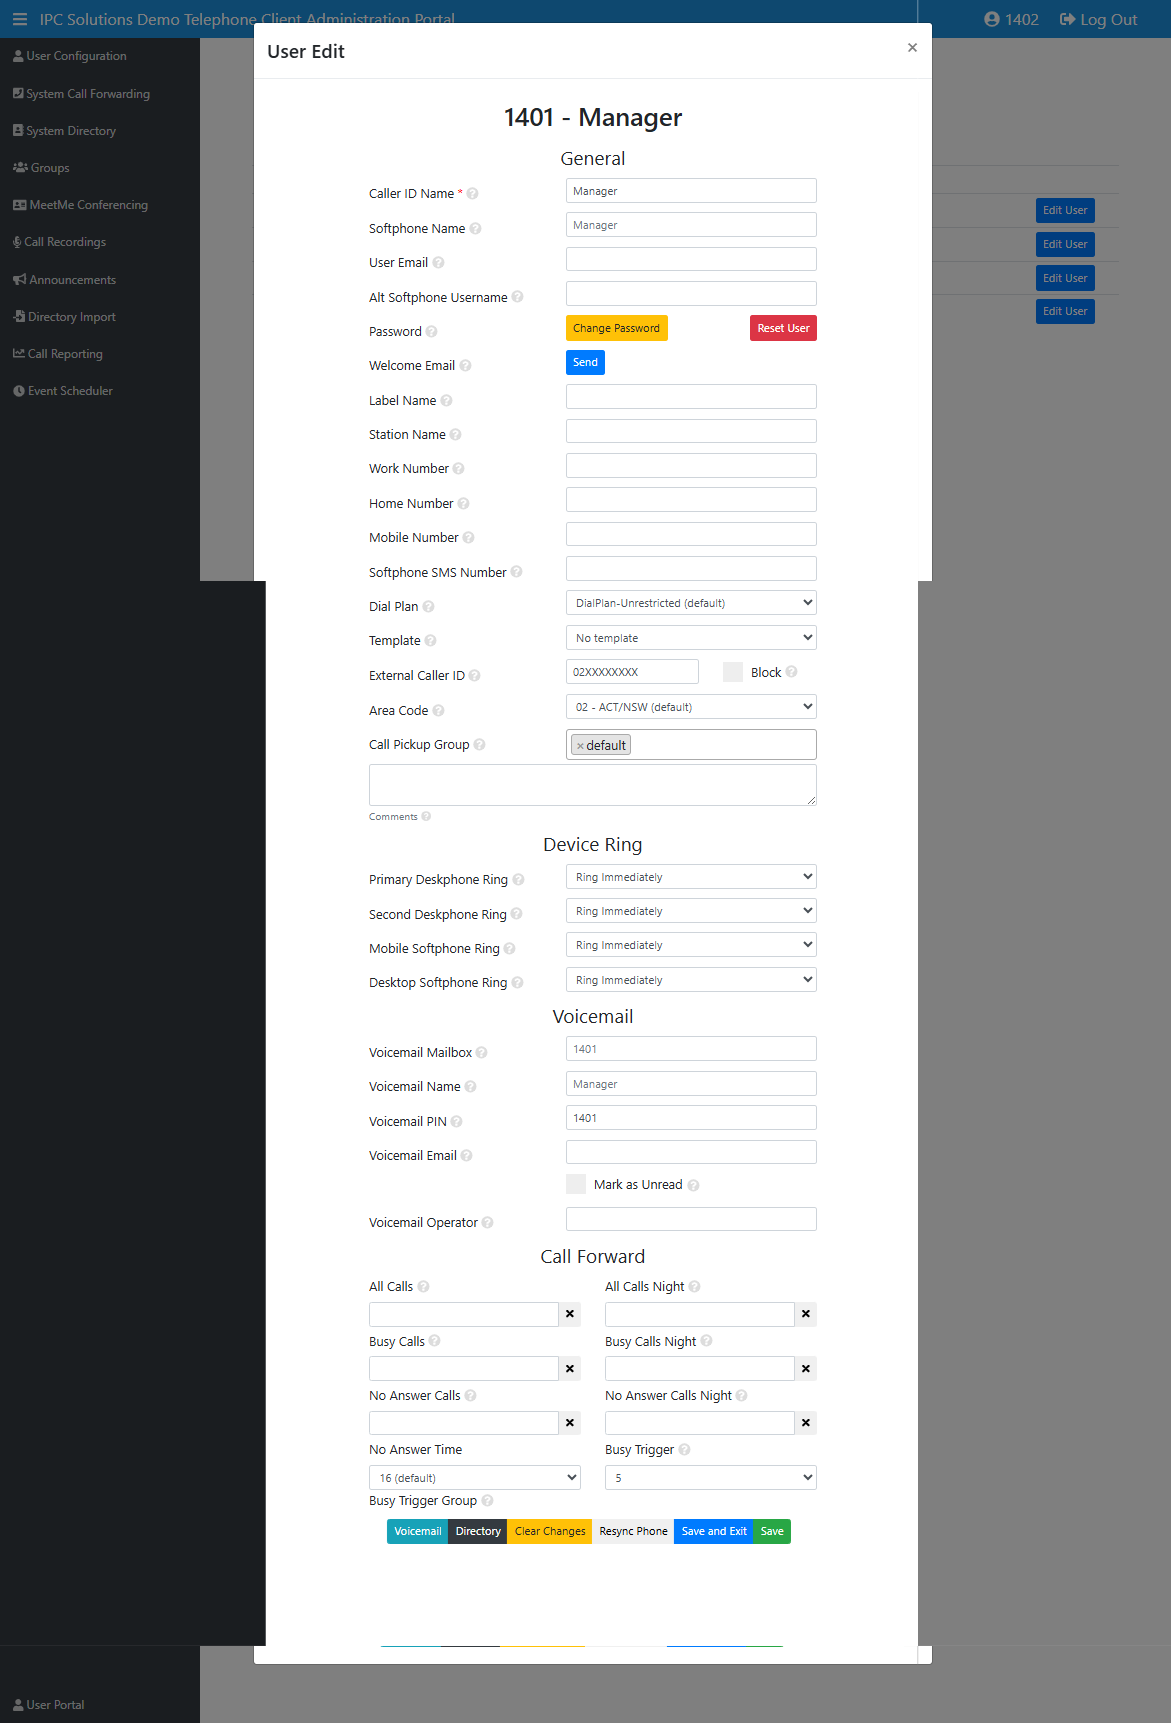
General
Caller ID Name | This is the name displayed when you make calls and is listed in the system directory. Click "Resync Phone" if you change this. |
Softphone Name | This is the name shown in your softphone's contacts. If not set, it defaults to the Caller ID Name. Click "Resync All Softphones" if you change this. |
User Email | This email is used for logging into the portal and softphone provisioning. Only your telephony provider can change this. |
Alt Softphone Username | The alt username is used as the softphone login username, for when your email address doesn't have a unique domain (eg. blah@gmail.com or blah@outlook.com). Your email address is still used for logging into the portal.Only your telephony provider can change this. |
Password | This password is for the portal and softphone login. It must be at least 8 characters long, with at least 1 number, 1 uppercase and 1 lowercase letter, and may contain special characters. Selecting Reset User removes all the details for the user, resets the voicemail mailbox and delete their personal directory. This should only be done where a user is being replaced with a new staff member. |
Welcome Email | Sends an introduction email to the address specified in the User Email field with portal URL, username, temporary password, and (if applicable) softphone installation URLs. Due to security factors, selecting this option will reset an existing portal/softphone password to a temporary password . |
Label Name | This is the name for the extension that is displayed on line keys of other phones / expansion modules. This is required when the Called ID Name is too long to fit on the label. If not configured, the Caller ID Name is used. Click Resync Phone if this parameter is changed. |
Station Name | The name that is displayed on the top left-hand corner of the extension deskphone(s) (if one or more is enabled). If not configured, the Caller ID Name is used. Click Resync Phone if this parameter is changed. |
Work Number | Any number specified here is displayed as a work number for this user when using a softphone (under Contacts / System Users). This is not shown in the System Directory. |
Home Number | Any number specified here is displayed as a home number for this user when using a softphone (under Contacts / System Users). This is not shown in the System Directory. |
Mobile Number | This number is displayed in the System directory and in softphone contacts. It is one of the available options for Call Forwarding and is the destination of the Mobile Simring feature. |
Dial Plan | Determines what the extension is allowed to dial and were the call is routed for a particular number dialled. It is usually used to enable a calling restriction (e.g., Internal calls only). |
Template | Configuration template for the user's deskphone, overriding the organisation default phone layout. This is used to configure phone features such as button functions. Templates can only be created/updated by your telephony provider. |
External Caller ID | Outgoing Caller ID number presented by this extension. Defaults to system configuration if not set. Useful where a business has more than one number and would like specific extensions to show a secondary number (eg. an accounts phone might show a direct accounts number). If you wish to call out anonymously from an extension, check the Block field. |
Area Code | The Area Code that is prefixed to local numbers called by the extension, It only needs to be configured if different to the system default. |
Call Pickup Group | Manually add or select existing groups for call pickup membership. This relates to using the GPickup softkey on a deskphone to answer calls ringing on other phones that are part of the same Call Pickup Group. |
Device Ring
For inbound calls to the system, calls are directed to specific extensions either by manual transfer or by pre-determined configuration. An extension can have one more devices that can be connected (e.g., a deskphone and/or a softphone ). If you have more than one device, it is rare that you wish for these to all ring simultaneously. For example, a user who has a deskphone present and a softphone would normally have the Deskphone ring immediately, then the softphone ring 5 seconds later.
Ring options for each device are as follows:
Primary Deskphone Ring | Don't Ring Ring Immediately |
Second Deskphone Ring | Don't Ring Ring Immediately |
Mobile Softphone Ring | Don't Ring Ring immediately Ring after x seconds (where x is anything from 3-10 seconds) |
Desktop Softphone Ring | Don't Ring Ring Immediately |
Voicemail
Each extension can have a voicemail mailbox which makes sense to utilise when any inbound calls go automatically to an extension. It is usual for all systems to have at least one voicemail mailbox set up (normally on extension 1400) to allow unanswered calls to the main number to have voicemail recorded. Note in such cases, the normal practice is for the call to go to a system announcement then flow through to the voicemail mailbox (without playing the specific greeting on that mailbox). If a system is configured with additional Direct In-Dial numbers to allow calls to go straight through to specific extensions, these extensions should have voicemail mailbox configured with an appropriate extension greeting recording via the voicemail facility.
Voicemail Mailbox | This is the designated mailbox for this extension, typically matching the extension number. However, it can be assigned to another extension to delegate voicemail messages to that specific mailbox. In such cases, the devices for this extension will be connected to the other extension voicemail facility (not their own). |
Voicemail Name | This is the name assigned to the mailbox, which is utilized in email communications regarding voicemail messages. (Not applicable if Voicemail Mailbox is set for a different extension.) |
Voicemail PIN | This is the numeric Personal Identification Number (PIN) required for accessing the voicemail mailbox. Set it the same as the extension number if you want the user to undergo the self-enrolment process during the next mailbox setup. (Not applicable if Voicemail Mailbox is set for a different extension.) |
Voicemail Email | This email address is used for sending voicemail notifications via email. Multiple email addresses can be added, separated by a pipe (|). Email notifications specify the number that left the message (if not anonymous), and have the message attached as .wav audio file. |
Mark as Unread | If selected, voicemail messages will be flagged as unread when sent via email. This triggers the message indicator on your phone, in addition to sending an email with the voicemail message attached. |
Voicemail Operator | This establishes the destination number for this extension when the caller presses '0' while listening to the voicemail greeting. Upon pressing '0', the call will be directed to this designated destination, or if configured, a default destination. Note: The user must inform the caller in the greeting that they can press '0' to be redirected. |
Call Forward
Call forwarding is only relevant where an inbound call is routed to one extension, not where calls go to a group mechanism which rings several extensions.
All Calls | Unconditionally forward all incoming calls to the specified number. You can manually enter a destination number or select from the provided list. |
All Calls Night | Unconditionally forward all incoming calls to the specified number during Night Mode. You can manually enter a destination number or select from the provided list. |
Busy Calls | Forward incoming calls to the specified number when the extension is engaged in another call. The Busy Trigger parameter determines the number of simultaneous calls that classify the extension as busy. For example, if you don't want to receive another call while on one call, set Busy Trigger to 1. This is akin to Call Waiting. You can manually enter a destination number or select from the provided list. |
Busy Calls Night | Forward incoming calls to the specified number when the extension is engaged in another call during Night Mode. The Busy Trigger parameter determines the number of simultaneous calls that classify the extension as busy. For example, if you don't want to receive another call while on one call, set Busy Trigger to 1. This is akin to Call Waiting. You can manually enter a destination number or select from the provided list. |
No Answer Calls | Forward incoming calls to the specified number when not answered within the defined time period set by the No Answer Time parameter. You can manually enter a destination number or select from the provided list. |
No Answer Calls Night | Forward incoming calls to the specified number when not answered within the defined time period set by the No Answer Time parameter during Night Mode. You can manually enter a destination number or select from the provided list. |
No Answer Time | Sets the time period of the call not being answered before triggering a ‘No Answer’ condition. |
Busy Trigger | Sets the number of simultaneous calls before the extension is classified as busy. Default is 2 calls. |
Busy Trigger Group | Sets the number of simultaneous calls before classifying the extension as busy for calls from groups. The default is 2 calls. |
If you scroll down the “User Edit” pop up window you will see the below buttons

Voicemail | Clicking this button will take you to the voicemails page where you can view all the voicemails received by the specific user you are currently editing, plus hear/record their voicemail mailbox greetings. |
Directory | This button will display the phone Directory section of the system, showing Personal contacts of the specific user, the contact information in the System Directory, and if applicable, a further Customer (LDAP) Directory. |
Clear Changes | Clicking this button will undo all the changes made on the current page, reverting back to the last saved configuration. |
Resync Phone | Clicking this button will synchronize the changes made with the user’s phone. Note that this action will only update the user's phone and not other devices. |
Save and Exit | This button saves the changes made and closes the "User Edit" pop-up window. However, it does not sync the changes with the phone unless the Resync Phone button was clicked. |
Save | Clicking this button saves the changes made but does not close the "User Edit" pop-up window. Similar to Save and Exit, it does not sync the changes with the phone unless the Resync Phone button was clicked. |
System Call Forwarding
System Call Forwarding enables you to temporarily redirect incoming calls to a variety of destinations such as ring groups, IVRs (Interactive Voice Response), hunt groups, and external numbers. This feature empowers you to customize call routing according to your specific needs.
The System Call Forwarding tab enables you to modify the destination of incoming calls. For instance, if someone calls your main number and the reception is unattended, this tab allows you to redirect that call to a different team within your organisation, to a specific phone number, to an Interactive Voice Response (IVR) system, or to a voicemail message. Updating System call forward destinations and syncing
All groups configured for a system are shown in the System Call Forwarding tab however not all are necessarily in use.
In the example below, the main business number is configured to route to the ring group entity ‘Reception RG’ (Dial Code = *401) during business hours. A ring group is designed to ring one or more phones simultaneously. The configuration of a ring group can be viewed in the Groups tab.

Section A: Group or IVR Name
Shows the name given to the specific group calls come to from one or more DIDs. It helps you identify the purpose of the group as well as its group type (eg. RG = Ring Group). The name of the group can be changed in the Groups tab.
Section B: Dial Code
Is a unique identifier for the group entity and is configured by your telephony provider.
Section C: Destination
Destination is where relevant calls are to be redirected to from the initial group. It could be another internal destination within the system or an external destination like a mobile number. When the destination is defined, the system will redirect calls going to the relevant group (in the example above ‘Reception RG’) to the new destination. Think of it as a system over-ride. Blanking out this field will deactivate call forwarding for this group.
Section D: Save Button
Clicking this button saves the changes you've made to the Destination field and activates the call forwarding over-ride instantly.
Section E: Clear Changes
Use this button to undo any changes you've made to the Destinations. However, it won't erase any previously saved changes or accidental clicks on the Save button
Configuration
Coming back to the example provided by the above screenshot, if you enter a mobile number in the Destination field and save it, all calls coming to the Ring Group *401 will from that time be redirected to the mobile number you entered. After making such a change, it is always a good idea to test the new configuration by making a call on the relevant DID.
System Directory
The System Directory allows external numbers to be entered into the system which serves two purposes:
Any inbound calls that match a number in the System Directory will show the associated Name for the number (Caller ID match);
The System Directory can be accessed from a deskphone or softphone to make calls looking for a particular name (rather than having to remember the number).
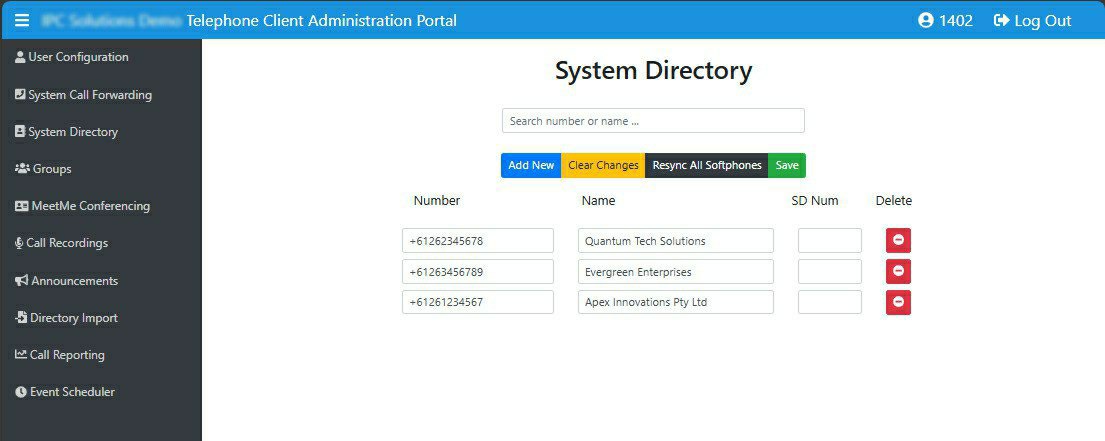
Adding new contacts to System Directory
Click on “Add New” Button and enter the information in for one contact.
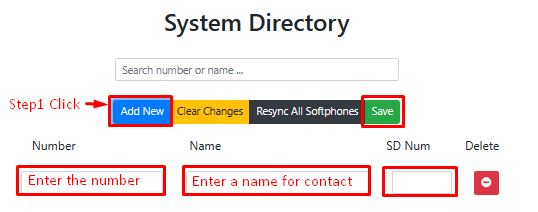
Click on Save button to save the new contact to the System Directory
Note that numbers are converted to international format if not entered that wayClick on Resync All Softphones to apply the changes to all softphones configured on the system
Deskphones are automatically updated upon Save
Deleting a contact from System Directory
Click on

button and then click the Save button to delete a contact from the System Directory
Click on Resync All Softphones to apply the update to all softphones configured on the system
Deskphones are automatically updated upon Save
Updating an Existing contact in System Directory
You can edit any of the fields in the System Directory simply by clicking the field and entering the new information
Click the Save button to save the updated information to the System Directory
Groups
This tab will allow you to view & configure the existing call-handling groups in the System, such as determining the participants of a group
An admin user cannot create new Groups and need to contact their telecommunications provider for where this is required.
Types of Groups
Ring Group:
Causes incoming calls to ring multiple extensions simultaneously.
Use Case: Ideal for situations where any of a number of specified staff can handle the call.
Example: A sales team where any available representative can answer an incoming sales call.
Hunt Group:
Causes incoming calls to a ring a different extensions on a sequential basis.
Use Case: Appropriate for scenarios where calls need to be routed through a specific order of agents.
Example: An IT support team where calls are routed to a primary technician first and then to backup technicians if the primary is unavailable.
Queue Group:
Manages incoming calls by placing them in a queue until an agent is available to take the call.
Use Case: Suitable for call centres where calls need to be managed in an orderly manner and distributed to agents based on availability or predefined rules.
Example: A customer service centre where calls are queued and distributed to the next available customer service representative.
IVR:
Provides an automated system for callers to interact with, often through a menu of options
Use Case: Used to direct calls to the appropriate department or service without the need for a human operator.
Example: A company’s main phone line where callers are greeted with a menu to choose the department they need, such as Sales, Support, or Billing.
Round Robin Group:
Distributes incoming calls evenly among a group of extensions in a rotating manner.
Use Case: Suitable for situations where calls need to be distributed fairly among a team to ensure equal workload.Example: A technical support team where each support agent takes turns answering incoming calls to ensure a balanced distribution of workload.
Managing Groups
To make changes to a group, click on the "Edit" button next to the desired group.
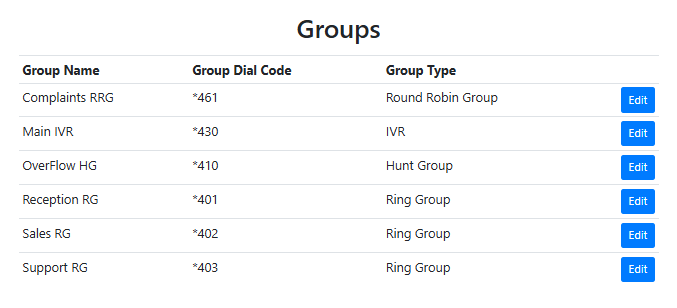
This action will open the "Edit Group" pop-up window.
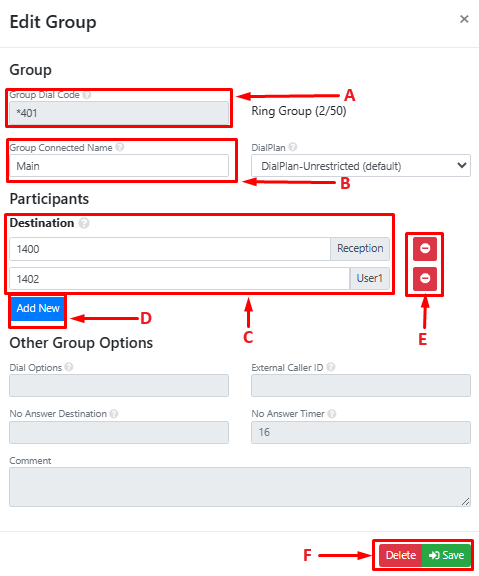
Section A: Group Dial Code
Is a unique identifier for the group entity and is configured by your telephony provider.
Section B: Group Connected Name
This is the name of the group and should reflect the purpose of the group as well as its group type (eg. RG = Ring Group, HG = Hunt Group, QG = Queue Group, IVR = Interactive Voice Response).
Section C: Participants
Here, you can configure group participants ranging from 1 to a maximum of 50.
Adding just the extension number will cause all devices associated with that extension to ring.
Alternatively, you can use specific constructs to dial devices directly, such as {extension}P for Primary Desk phone, {extension}A for Secondary Desk phone, etc.
Section D: “Add New” Button
Click this button to add a new member to the group. You can either select a member from the list or manually enter the extension number.
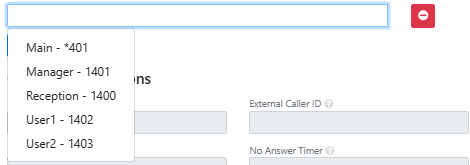
You can select a member from the list or type the extension number manually
Section E: “Delete” Button
This button is used to remove a member from the group.
Section F: “Delete” / “Save” Buttons
The "Delete" button removes the entire group along with all its configurations. This action cannot be undone.
The "Save" button saves the changes made in the "Edit Group" pop-up window.
Editing and IVR
Click “Edit” Next to an IVR and the below screen will appear which will allow you to manage the IVR:
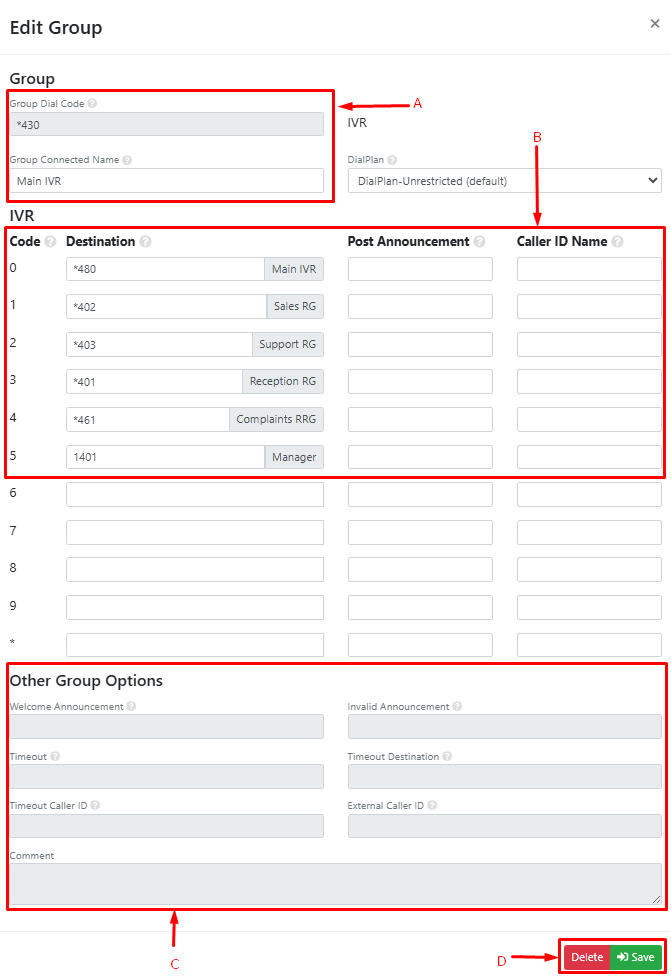
Section A: IVR Identifiers
Group Dial code: This is the unique dial code assigned to the IVR you are editing. It cannot be modified from the admin user profile.
Group Connected Name: The name assigned to the IVR for identification within the system and in call reports.
Section B: IVR Options and Destinations Configuration
This section is the main part of the IVR configuration as this will determine the whole flow of the call that comes into this IVR.
Code:
Numeric key option that callers can select to reach a specific destination.
Destination:
The system destination associated with each numeric code.
Post Announcement:
An announcement played immediately after the caller selects an option. After the announcement, the call is redirected to the specified destination.
Caller ID Name:
The caller ID displayed on the user’s phone to help recognize the type of call being received.
Section C: Other options for IVR
This section allows you to customize various settings related to the IVR system. These settings help manage how calls are handled and routed within the system.
Welcome Announcement:
The Welcome Announcement is the initial greeting played to callers when they reach the IVR. This message should provide a warm welcome and concise instructions or options for the caller to navigate through the system.
Invalid Announcement:
The Invalid Announcement is played when a caller inputs an unrecognized or incorrect option. This message should inform the caller of the error and guide them on how to proceed or re-enter their choice correctly.
Timeout:
The Timeout setting defines the duration (in seconds) the system waits for a caller to make a selection before taking further action. This helps manage situations where a caller may be indecisive or slow in responding.
Timeout Destination:
The Timeout Destination specifies the action or destination where calls are routed if the caller does not make a selection within the timeout period. This could be another menu, a voicemail box, or a live operator.
Timeout Caller ID:
The Timeout Caller ID is the caller identification information used when a call is redirected due to the timeout destination. This helps ensure that the redirected call carries appropriate caller ID details for tracking and response purposes.
External Caller ID:
The External Caller ID is the caller identification information displayed when a call is forwarded to an external number or device. This ensures that the recipient of the forwarded call sees the correct caller ID information.
Comment:
The Comment section allows you to add notes or additional information regarding the specific IVR settings. This can be useful for administrative purposes or for providing context to other users managing the system.
Section D: Delete/Save Button
Delete: This button allows you to remove the current IVR configuration. Use this with caution as it will permanently delete the selected IVR and all of its configurations.
Save: This button saves any changes made to the IVR configuration. Ensure all settings are correct before saving to avoid disruptions in the call flow
MeetMe Conferencing
TBA
Call Recordings
The Call Recording feature in Communication Manager, provided by IPC Solutions, offers administrators the capability to record and access recorded calls for extensions within the system. This feature serves as a valuable tool for monitoring and improving communication practices, ensuring compliance with regulations, and resolving disputes or discrepancies effectively.
Further details TBA
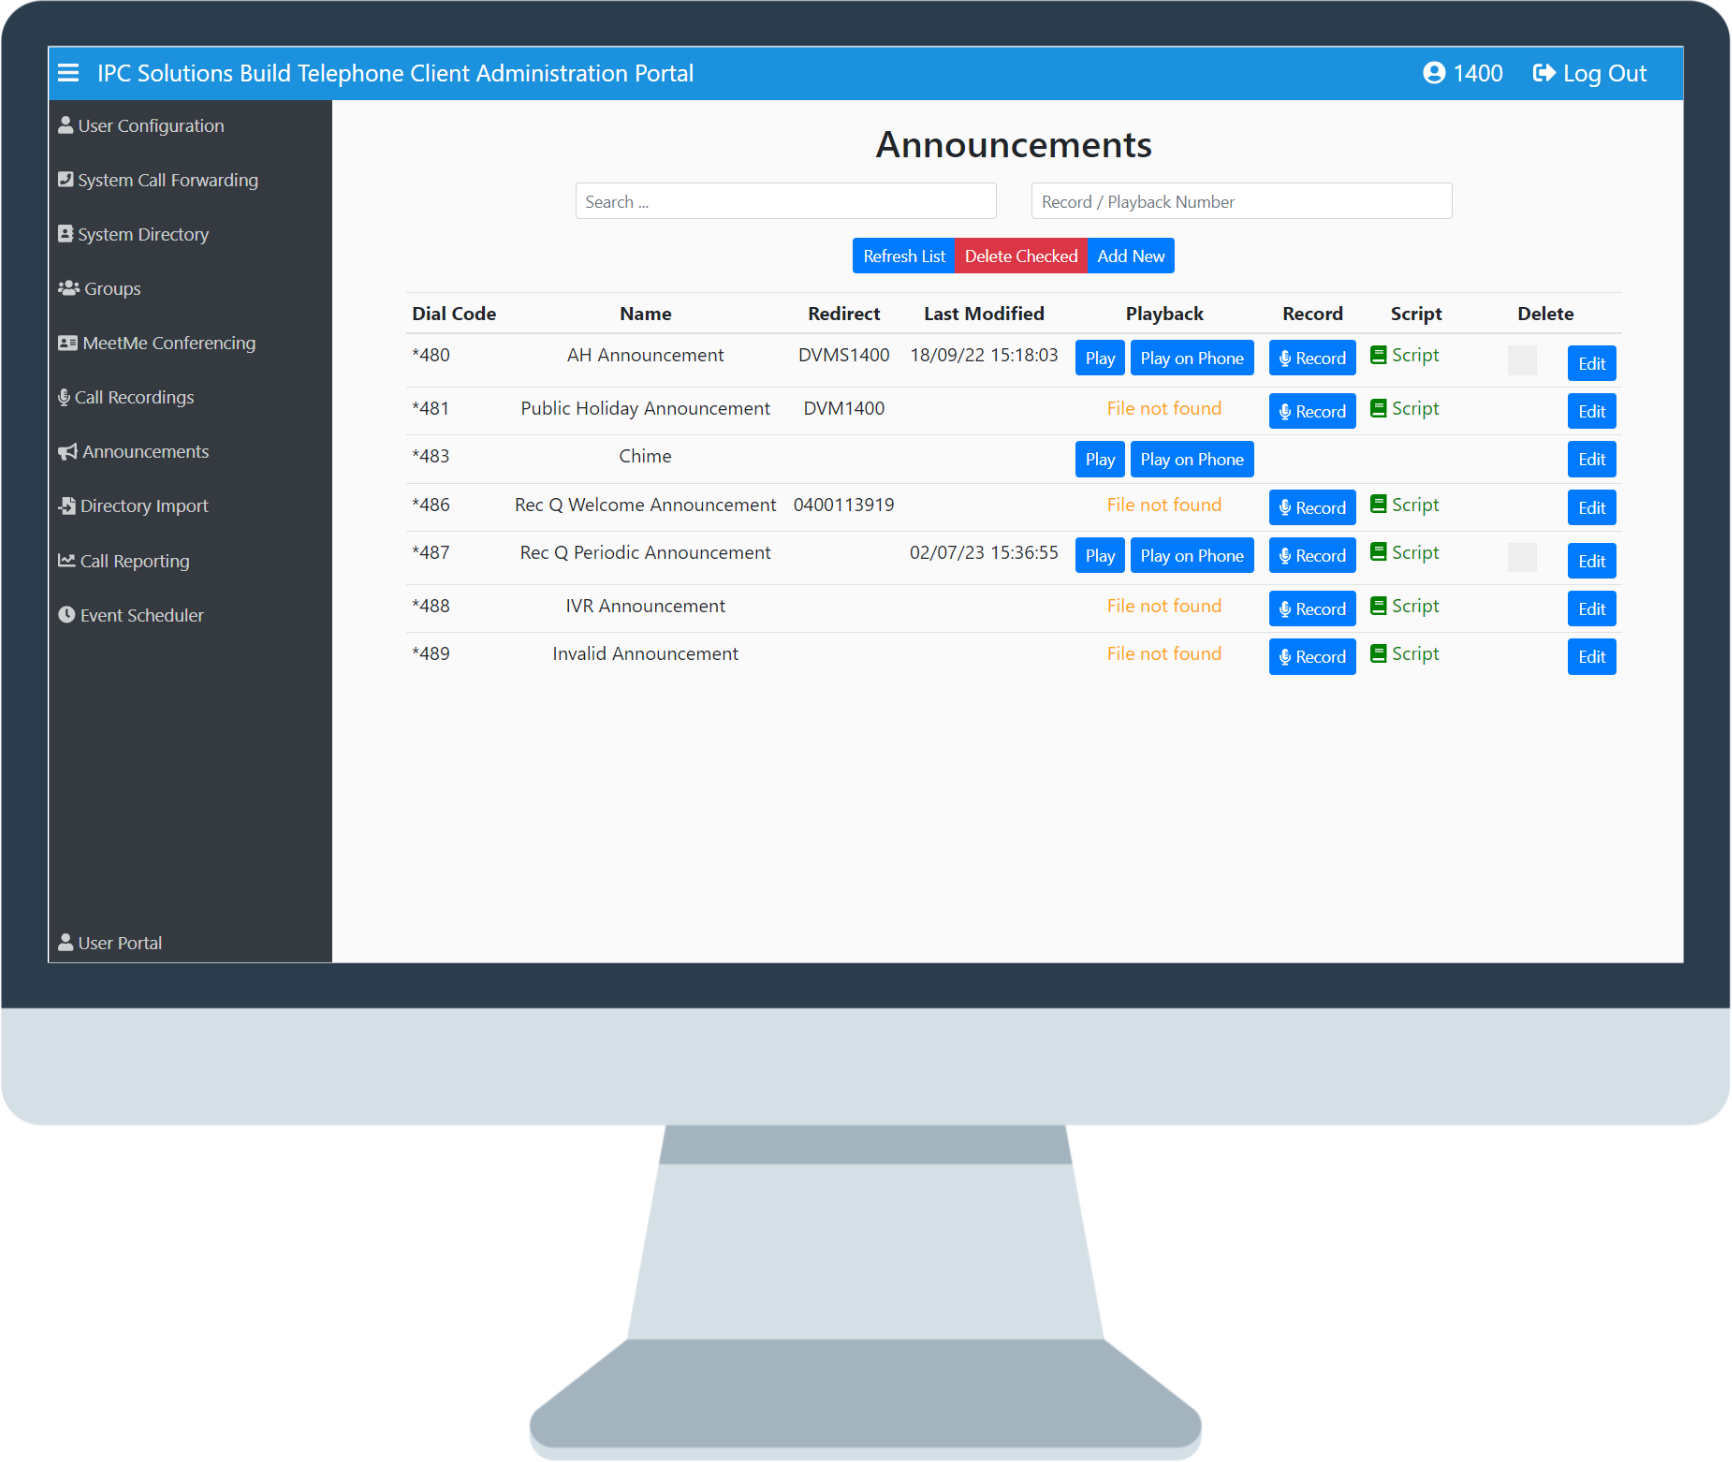
Announcements
What are system announcements?
Announcements are pre-recorded messages that are used as part of the call-handling flow to communicate to callers useful information. Common examples are announcements to:
Answer calls after hours advising the business hours;
Play after a period of time of a call not being answered to apologise that the call can’t be answered and to ask the caller to leave a message;
Welcome a caller to the business and give them options to redirect their call (press 1 for…)
Notify callers that the business is temporarily closed and to leave a message
Special recordings with music to promote business services while on hold
Note there is also the ability for greetings to be recorded and played back for personal voicemail. These are not shown here but under the specific user voicemail option.
Recording a new announcement
To record a new announcement perform the following:
Click on the Announcements tab. Your announcement should already be pre-configured ready to go.
Click on the Script icon next to the announcement and create your script. Make sure it is easy to read and is written exactly how you want to say it. IPC Solutions can help you create this. Click Save to save it in the system.

Enter the number of the phone that you wish to use to record the announcement in the Record / Playback text box. Click on the Script icon next to the announcement and select Record . The Record / Playback number you entered above should ring and you can record the message. The script is shown to read from. To give the best recording quality, use the handset rather than a headset.
Click on Refresh List and click on the Play button to listen to your message on your computer or Play on Phone button to listen to your message on the phone
Recording an existing announcement
Deleting Announcement
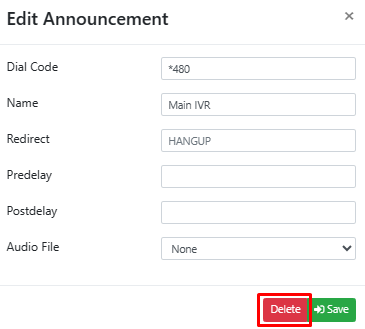
To delete an announcement from the system Click on “Edit” next to the announcement that you wish to remove:

Then Click on “Delete” button:
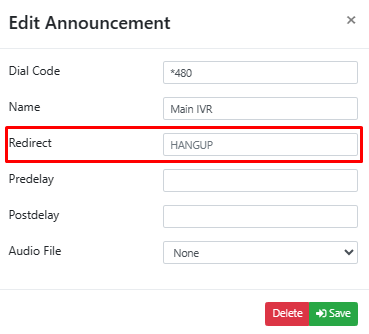
Redirecting calls after an announcement is played
You can decide what should happen to a call after the announcement is played. And to do this you need to find the correct destination and enter it below:
Directory Import
The Directory Import feature enables you to seamlessly add contacts to the system by importing data from another platform or system in CSV file format. This functionality also allows you to compile a list of contacts in MS Excel, saving it as a CSV file, and then effortlessly uploading it to the system.

Section A: Upload
This button is used to upload the CSV file that you selected by clicking the browse button in the Section B
Section B: Browse
Click this button to browse for CSV files from your computer
Section C: Text Box
The file name of the CSV file you selected will be shown here
Section D: Write to Directory
Used to save the contents of the uploaded CSV file into the system directory
Note: Click on “Resync All Phones” under phone actions to apply the changes to all the phones
Section E: Download Example CSV File
Clicking this button will download a file that provides you with an example of the layout of the CSV file that is required to be uploaded to correctly add directory contacts.
Call Reporting
The Call Reporting feature on the system is a powerful tool designed to enhance communication management within an organization. This feature provides information on incoming and outgoing calls, assisting in understanding call volume and details.
Using filters
You can use multiple filters to customize the reports as per your requirements.
Number search
This field allows you to search for specific phone numbers within the call data. It can be used to filter the report to include only calls associated with a particular phone number, whether it's an internal extension or an external number.
Call Type
Call Type refers to the classification of calls, such as inbound, outbound, or both. This field enables you to filter the report based on the type of calls you are interested in analyzing.
Sort by
Sort By determines the order in which the call records are presented in the report.
You can choose to sort the data based on two methods: Date and Duration
The default of Date shows calls in the order they happen. Duration shows calls by length of call.
Call state
The Call State field typically includes distinct types or categories that categorize the different states a call can be in
All | Represents all calls, regardless of their outcome or status. |
No Answer | Indicates calls where the call wasn’t answered (usually because the caller terminated the call before that happened). |
Congestion | Denotes calls that faced network congestion or difficulties during the connection attempt. |
Busy | Indicates calls that were not answered due to the recipient being engaged with another call. |
Failed | Represents calls that did not successfully connect. |
Answered | Represents calls that were answered either by a person, by voicemail, or by the recipient telephone system (eg. an announcement plays). |
Date From
This field represents the starting date for a specified time range in a report. It allows you to narrow down the scope of the report to a particular date range.
Date To
"Date To" is the ending date for the specified time range in a report. It works in conjunction with the "Date From" field to define the overall timeframe for the report.
Time From
The "Time From" field corresponds to the starting time within a day for a specified time range (that was selected under “Date From” field). You can use this field to focus on calls occurring during a specific time period.
Time To
Similar to "Time From," the "Time To" field sets the ending time within a day for the specified time range (that was selected under “Date To” field). It complements the "Time From" field, helping define the complete time interval for the report.
Generating reports
You can click on “Refresh List” button to generate the default report which shows all calls for the past 30 days, showing the most recent calls at the top.
Example:

If you generate a call report with the filters specified above, the report will focus on outgoing calls specifically to the number 0261404656. It will only include successfully answered outgoing calls, presenting the data in chronological order based on the call dates. The time frame for this report will be from 12:00 PM on December 8, 2023, to 2:00 PM on December 14, 2023. This customized report provides a detailed overview of the organization's outgoing communication activities to the specified number within the defined date and time range, allowing for a targeted analysis of the relevant call data.
Exporting Reports
By Clicking on the “Download Output” you can export the generated report into a CSV file
Exporting a call report to a CSV file is a common practice in data analysis and reporting.
Benefits of CSV Export
Exporting to CSV is beneficial because it produces a lightweight, easily shareable file format.
CSV files are widely compatible with various spreadsheet software and database systems, making it convenient for further analysis, reporting, or integration with other tools.
Here's an explanation of how exporting a call report to a CSV file typically works
Step 1: Generate the Call Report
Generate the call report with the desired filters and parameters, obtaining the dataset that you want to analyze
Step 2: Exporting
Once you have generated the report you need, click on “Download Output”
Step 3: Specify File Location and Name
Determine where you want to save the exported CSV file on your computer or server. You may also need to provide a name for the file.
Step 4: Confirm Export
Confirm and execute the export process. The system will then convert the call report data into a CSV file.
Event Scheduler
TBA
